In this article, we'll
cover the re-assembly of a T Air Cleaner, using a new filter "sock"
from Zarwerks. But before we get to the pics and details, we'll answer
the question that puzzles most people about these (expensive!) air filters:
How the hell do you get them apart???
Taking it
apart
Well the reason that I don't
have any pictures of the "taking apart" stages is that it takes two hands
to do it! The "endcaps" of the filter, as you can probably tell looking
at it, are pressed over the ends with a slightly rolled edge to keep it
on. To start, assess the looseness of the end caps by firmly grabbing
each end of the filter and twisting the endcaps. If they are loose, the
will spin on the end of the housing. If they are right, rusted, or heavily
painted over, they won't.
I have removed a precious
few with no tools at all, but more or less "manhandling them".
These would be the ones with "loose", turn able ends. By gripping
the housing firmly and squeezing it a bit just under the cap, you can
sometimes "walk" the cap off. Once you get a bit of the lip
over the end of the can, you can walk the rest around. You can carefully
insert a thin screwdriver to help the cap off, but be careful not to deform
the metal. Success with this method alone is rare, they usually need the
one of following techniques.
Prying the lip up gently will help
release the grip of the endcap on the housing, but great care is required
to keep from deforming the metal. Yes it can be bend back usually, but
on a particularly nice specimen, it is worth the effort to go very slowly.
I have made a tool for this purpose, a picture of it is below. It allows
me to gently grab the lip of the end cap and bend it out just a bit, working
my way around a bit at a time. The objective is not to pry the lip all
the way out 90 degrees from the endplane of the can, but just to release
it a bit so I can "walk" the endcap off with the "manhandle"
technique described above.
When this doesn't work, or even
if it does loose the cap a bit, I often have to lay the filter flat on
a folded towel or rag, and lay a flatlblade screwdriver along the side
of the housing and and tap at the lip in a few places to nudge it off
the end of the housing. You do not want a "sharp" screw driver
for this, use and old one, and square blunt the end of it a bit on your
bench grinder so it has a flat end about 1/32" thick.
No matter how careful you are, these
techniques will bend and mar the metal at least a tiny bit. The presumption
is that you are restoring and repainting this filter as you go. If you
are not, be prepared to live with a few "tooling marks" worst
case....
Restoring and
Repainting the Metal Parts
I highly recommend stripping all
of the metal parts addressing any dents or damage issues, and repainting
the inside surfaces of the parts prior to reassembly. Also paint a thin
coating of paint on the outside ends, where the endcap lips will cover
(the last 3/16" or so). If not, rust can form on these unpainted
surfaces. Blasting with an extra fine aluminum oxide followed by a glass
bead will leave a real nice surface and will not damage the embossed lettering.
Once it is reassembled, the outside
can be repainted. Use the technique in the pics below to tape off the
inlet holes. A large wooden dowel or pipe inserted into the carb opening
will allow you access to all surfaces without any masking, and will give
you a "handle" to hold the piece while shooting it.
For paint, it is best to use whatever
paint is used on your engine tin for consistency. I am a big fan of Eastwood's
"Chassis Black" semi gloss epoxy enamel. It covers very well,
comes in quarts or spray cans and it quite durable. I personally do not
like ceramic coatings on the filters as, because of their thickness and
"flow" they tend to soften the crispness of the embossed lettering,
making it look a bit "melted".
Reassembly
After the procedure shown below,
reassembly is as simple as putting the endcaps back on. If you created
crimp marks on the lips by bending and prying, address those now using
a narrow pair of pliers. You should be able to "walk" the caps
back on the same way you got them off. You can gently tap the lips back
down flush against the housing, but do not use a sharp, flat tool for
this, as it will eave marks. A soft tool, plastic or wooden works better
and tends to leave no marks. Picky? Get a few wooden paint stirrers and
gently shape the ends with a slight concave curve that matches the curve
of the housing. Lay the housing on a clean towel and gently tap all the
way around. Patience is key.
One detail that is
not addressed in the picture series below is that of the "split rivet"
that is used to secure the bottlecap to the endcap on the inlet end. In
sime cases, an original rivet can be re-used. But most of the time, it
is too waekend or broken to be used again. Split rivets are available
from hardware suppliers, but most all we have found that have the right
shank size and depth, have heads that are way too big and don't look right
on the endcap.
Our best results have
been to create out own using a nail with about a 3/32" shank. The
nail is first cut off to the proper length, then placed upside down in
a drill press and turned at a low speed. A file can be used to then shape
the head to that of the original rivet. It is a pretty narrow "button"
head. Once that is done, a Dremel tool and a "409" disc can
be used to carefull slit the end and make a suitable rivet.
A
long steel rod with a wedge shapped end can be used via the "holding
tool" shown to split the rivet ends once installed, followed by a
blunt end rod to flatten it inside the bottle cap.
Installing a New
Filter "Sock"
In the series of pics below, 2 sets
of pictures are used. In the first set, the filter parts are freshly blasted
and unpainted. It is possible to restore a filter this way, and paint
it afterward, but it is not the best way. It leaves the inside of the
housing, and over time, depending on the environment, it will rust. The
advantage of doing it this way, is that you do not have to press fit the
ends on freshly painted parts.
You may click on any pic below for
a full sized image in another browser window.
Good luck!!
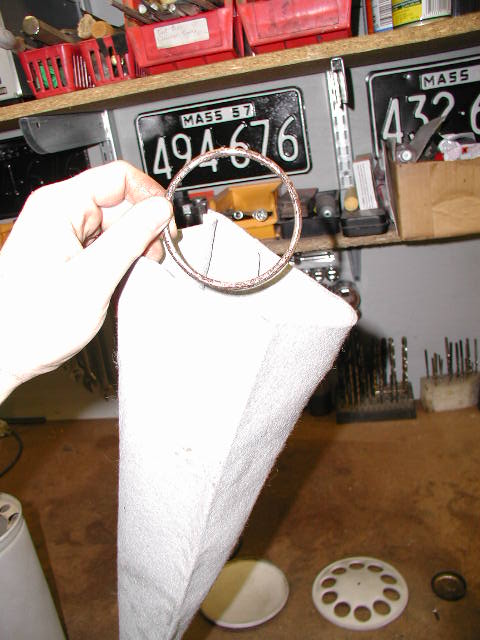
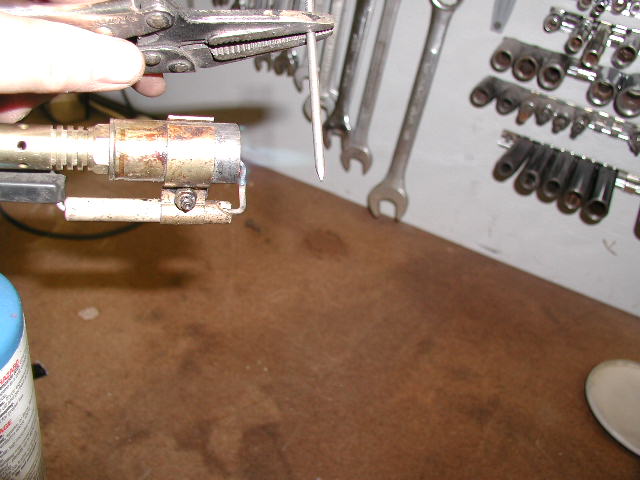
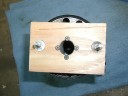
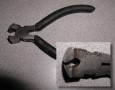 Here
is the tool mentioned above. It is basically a flush cut "nibbler"
type wire cutter, with one edge flattened with a grinding disc. This edge
is used above the lip of the lid, while the sharp edge is used to gently
pry up the lip a bit. Here
is the tool mentioned above. It is basically a flush cut "nibbler"
type wire cutter, with one edge flattened with a grinding disc. This edge
is used above the lip of the lid, while the sharp edge is used to gently
pry up the lip a bit.
|
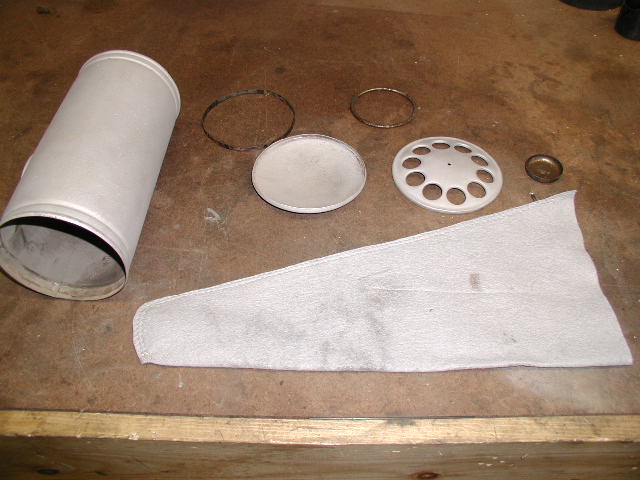
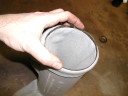
 We'll
start with these parts: We'll
start with these parts:
- The filter housing
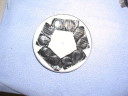
- The two end caps
- The "bottle
cap"
- The large and small
steel rings
|
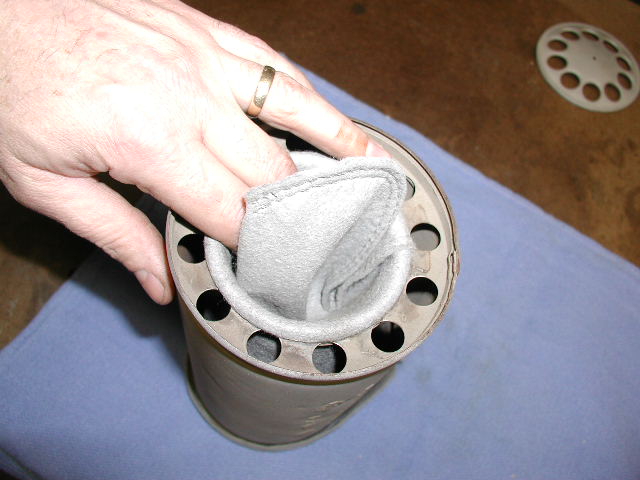
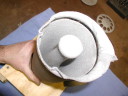
 The
first step is a simple one. Pick up your new filter sock, and drop the
smaller steel ring into it. The
first step is a simple one. Pick up your new filter sock, and drop the
smaller steel ring into it.
|
 Now
insert the sock, open/wide end first, into the end of the housing with
the round flange and holes. The ring will stay down in the small end
of the sick. Now
insert the sock, open/wide end first, into the end of the housing with
the round flange and holes. The ring will stay down in the small end
of the sick.
|
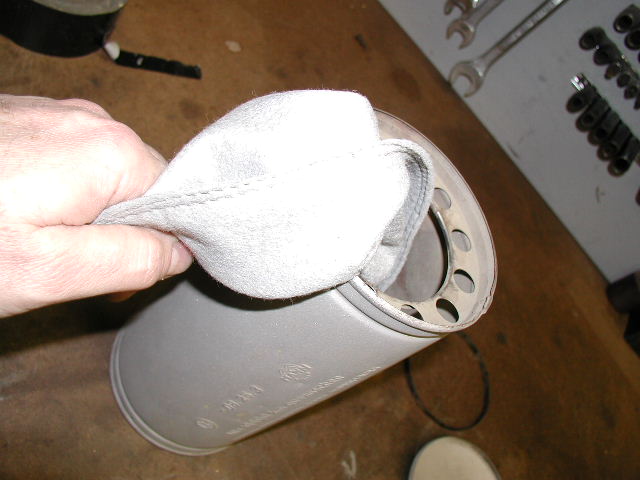
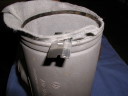
 Flip
the housing over and pull the wide end of the sock out of the end of
the housing and roll the edge of the sock over the lip of the housing
much like you do with a plastic trash bag in a trash can. Flip
the housing over and pull the wide end of the sock out of the end of
the housing and roll the edge of the sock over the lip of the housing
much like you do with a plastic trash bag in a trash can.
The ring is still down in the
small part of the sock (it is too big to fit through the flange opening
actually, it has to stay there......)
|
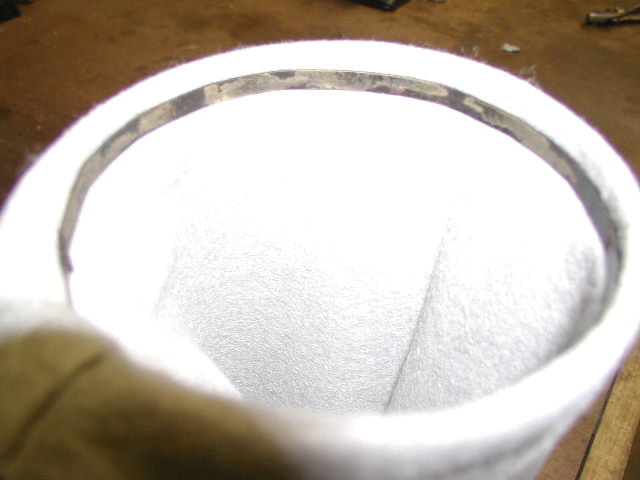
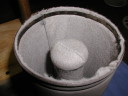
 Now
slip the large, flat steel ring inside the open end of the housing as
shown in the pic. It is a tight fit, and it is best to keep the ring
perfectly round, and not kink or crimp the ring and then try to round
it out once inside. That will often weaken the ring. Now
slip the large, flat steel ring inside the open end of the housing as
shown in the pic. It is a tight fit, and it is best to keep the ring
perfectly round, and not kink or crimp the ring and then try to round
it out once inside. That will often weaken the ring.
Tap lightly all around it with
a small hammer. There should only be about 1/2" (13mm) of felt
sock rolled over outside the housing.
|
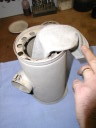
 The
ring should seat evenly just below the top edge of the housing. Inspect
the outside of the housing to see the recess rolled into the housing
if needed. The
ring should seat evenly just below the top edge of the housing. Inspect
the outside of the housing to see the recess rolled into the housing
if needed.
|
 Now
flip the housing over and the smaller end should be hanging out, with
the smaller steel ring inside. Now
flip the housing over and the smaller end should be hanging out, with
the smaller steel ring inside.
|
 Pull
the small end of the sock out and taught. Pull
the small end of the sock out and taught.
|
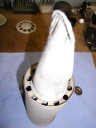 As
you pull the small end up, work the steel ring inside down against the
flange. As
you pull the small end up, work the steel ring inside down against the
flange.
|
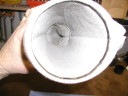 Make
sure the felt is reasonably tight and even when looking in from the
other end. If it is bunched up on one side, remove the large steel band,
adjust the large end of it where it rolls over the housing edge, and
re-insert the band. Make
sure the felt is reasonably tight and even when looking in from the
other end. If it is bunched up on one side, remove the large steel band,
adjust the large end of it where it rolls over the housing edge, and
re-insert the band.
|
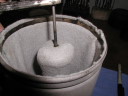
  Once
the large end of the felt is stretched tight and smooth, push the small
end of the sock down through the ring toward the other end of the housing. Once
the large end of the felt is stretched tight and smooth, push the small
end of the sock down through the ring toward the other end of the housing.
|
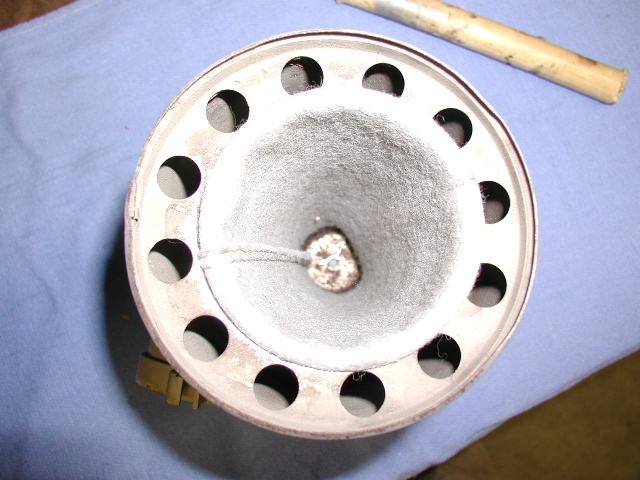
 Once
the small end is pushed all the way to the other end, drop the "bottlecap",
dished side up, into the sock. Once
the small end is pushed all the way to the other end, drop the "bottlecap",
dished side up, into the sock.
|
 Use
a dowel or screwdriver to push it all the way to the bottom. Use
a dowel or screwdriver to push it all the way to the bottom.
|
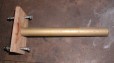
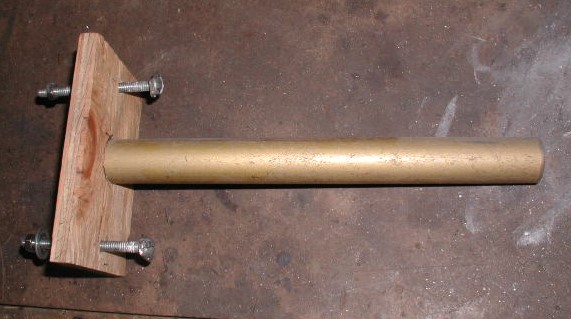
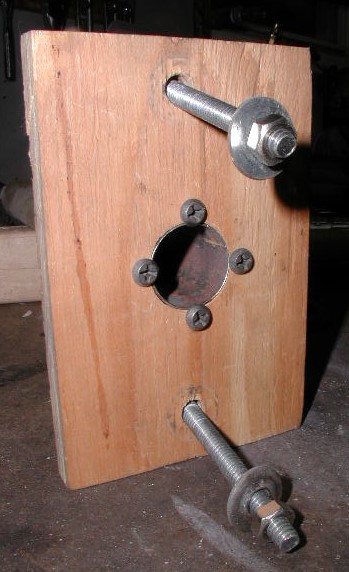
 Here
is a tool I made to help with the reassembly of the air cleaner. The
challenge is being able to hold the "bottlecap" down at the
bottom of the small end of the filter and keep it tight while you tap
the rivet in place. Read on... Here
is a tool I made to help with the reassembly of the air cleaner. The
challenge is being able to hold the "bottlecap" down at the
bottom of the small end of the filter and keep it tight while you tap
the rivet in place. Read on...
|
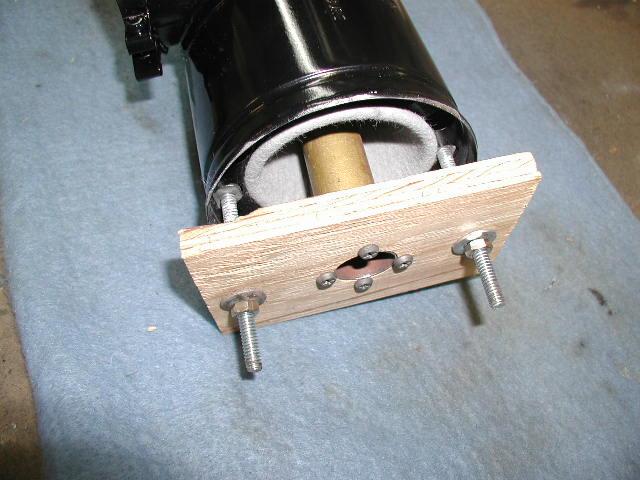
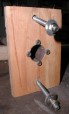
 Here
we jump to some pics of a cleaner being assembled after paint to see
the use of this tool. The steel tube goes down into the filter sock
and its end rests against the bottle cap. The bolt heads, with the oblong,
offset heads are slipped into holes on opposite sides of the circular
flange and the bolts tightened. This presses the bottle cap down toward
the far end, tightening the filter sock. Here
we jump to some pics of a cleaner being assembled after paint to see
the use of this tool. The steel tube goes down into the filter sock
and its end rests against the bottle cap. The bolt heads, with the oblong,
offset heads are slipped into holes on opposite sides of the circular
flange and the bolts tightened. This presses the bottle cap down toward
the far end, tightening the filter sock.
|
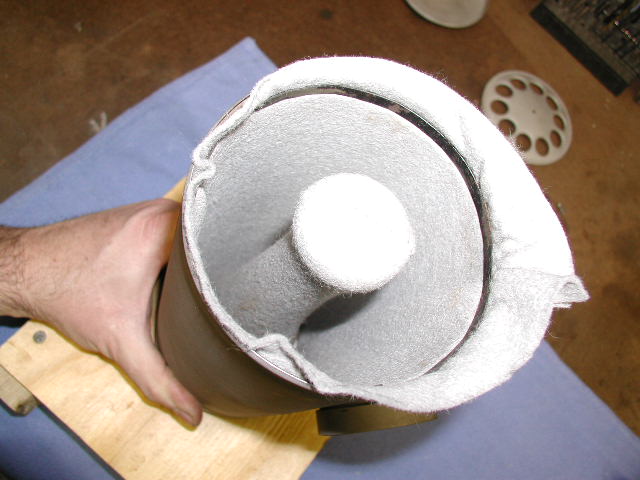
 "Orthoscopically"
you now have a clear shot at the far end of the filter. "Orthoscopically"
you now have a clear shot at the far end of the filter.
|
 You
can see the filter sock is stretched tight (a slightly different version
of the tool was used here, but it is the same idea). You
can see the filter sock is stretched tight (a slightly different version
of the tool was used here, but it is the same idea).
|
 On
the flange end, the function of the small steel ring is evident. It
is normal for it to be tilted slightly as seen in this picture. This
is because the stitched seam along one side does not stretch as much
as the remainder of the sock. The ring is larger than the hole in the
flange and it cannot slip through no matter how much it is tilted. On
the flange end, the function of the small steel ring is evident. It
is normal for it to be tilted slightly as seen in this picture. This
is because the stitched seam along one side does not stretch as much
as the remainder of the sock. The ring is larger than the hole in the
flange and it cannot slip through no matter how much it is tilted.
|
 If
you are happy with the "stretch" of the felt overall, trim off
the excess on the big end. If the sock is not stretched tight or has folds
or creases, you may need to pry out the steel band again and reset it.
If the tool you use cannot push the small end of the sock all the way
to the end of the housing, you may need to remove the steel band and reset
the sock, allowing more felt inside the housing. If
you are happy with the "stretch" of the felt overall, trim off
the excess on the big end. If the sock is not stretched tight or has folds
or creases, you may need to pry out the steel band again and reset it.
If the tool you use cannot push the small end of the sock all the way
to the end of the housing, you may need to remove the steel band and reset
the sock, allowing more felt inside the housing.
A nice tight felt with no sags
or creases is nice, but keep in mind that even if it not perfect, it
will still function a and the felt is pretty hard to see once the filter
is assembled.
|
 Making a hole in the sock end for the rivet will make installing the
rivet easier. One way to do this is to heat up a nail with a torch and
burn a hole through the felt over the hole in the bottle cap. This makes
a clean, ragged free hole.
Making a hole in the sock end for the rivet will make installing the
rivet easier. One way to do this is to heat up a nail with a torch and
burn a hole through the felt over the hole in the bottle cap. This makes
a clean, ragged free hole.
|
 As
stated above, assembling the filter before painting is not the best
way, but if you happen to have to do it, you can tape up the holes on
the cap end from underneath.... As
stated above, assembling the filter before painting is not the best
way, but if you happen to have to do it, you can tape up the holes on
the cap end from underneath....
|
 ....and
work the cap on the end as described above. Once the paint has dried,
you can push the tape back into the filter and fish the pieces out with
tweezers or needlenose pliers. ....and
work the cap on the end as described above. Once the paint has dried,
you can push the tape back into the filter and fish the pieces out with
tweezers or needlenose pliers.
|
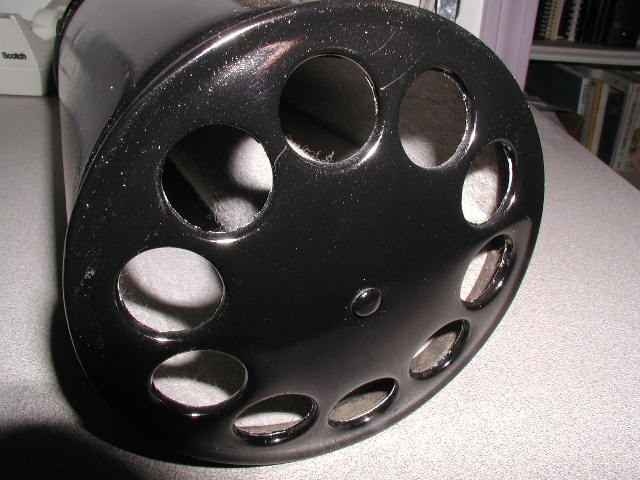
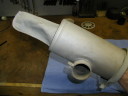
 Here
is a picture of the finished job, after painting. Here
is a picture of the finished job, after painting.
|
|